Showing posts with label crafty bitch. Show all posts

Thursday, May 24, 2012

Baby Shower: How To-ing

So, I got a few questions about some of the DIY stuff I did for my sister's baby shower, so thought I'd show you how I did everything/where I found the directions/etc.

Mason Jars
So, while the mason jars did take some time, they were really easy and made such an awesome addition to the shower. Plus, I still have the jars so can re-use/re-purpose for any other showers/parties/get-togethers.

What you need:
Mason Jars (we bought two dozen - approx $22, but you can surely find them cheaper)
Ribbon (we really wanted stripes and they need to be 7/8 inches, so we ordered ours)
Hot Glue Gun
Super-cute paper-straws (totally optional, but totally worth it)

First - cut ribbon in three different sizes. You'll need the first length to wrap all the way around the jar, the second link to make a loop the size of your bow and the third length to wrap your bow. 


Now simply wrap the ribbon around the mason jar and affix it with a dab of hot glue (trust me on the "dab," it's much easier to scrape off). 


Now make your bow "loop" and glue to close the loop.


  Now take your shortest ribbon, loop it around to make a bow and add a bit of hot glue.

Now, glue the bow to the jar, add a cute straw and VOILA:

Now, repeat 23 more times. See what I mean? Not hard at all, doesn't take that long to do one. Just really repetitive.

Tissue Poufs
Let's face it - tutorials are not my strong suit. I followed these directions and, let's face it, I actually bought a kit to do the teal ones because 1. I couldn't find tissue paper that color and 2. I'm lazy.

Tie Wreath
 
My original inspiration came from this Father's Day tie wreath I found on Pinny. It was very easy, too. (See a trend, here?)

What you Need:
Men's White Collared Shirt (Go to a thrift store - approx $4)
Men's Tie (Thrift store - approx $2)
Wreath (styrofoam or otherwise - approx $4)
Yarn (approx $3)
Wooden letter ( approx $2)
Spray paint (already owned)

First, wrap the yarn around the wreath like you would for any yarn wreath.Then, take your collared shirt (ensure it's buttoned) and cut down the button line and around the collar and back down. Then, take your tie and have your husband or whatever man in your life tie the tie for you. (Or bonus points if you actually know how to tie a tie yourself!) Wrap the tie around the collar and then I just used straight pens to attach the top of the collar and the bottom to the wreath.


I got a little lazy with the yarn in the back, as you can see...

But overall, it turned out well and the whole thing only cost me about $15. Can I get a "holler"?

So, that's how I knocked out some of the fun decor for the baby shower. Hope everyone has a great Memorial Day Weekend!

Monday, May 14, 2012

Books, Bow Ties & Baby Showers

This past weekend, the day we've been planning for months was finally here: my sister's baby shower and it could not have gone better! As I've mentioned, we had a pretty clear idea of what we wanted to do - no "theme" per se, but for our sweet little Eli, we asked everyone to bring a book in the place of a card to help build his library. So with that in mind, we wanted to decorate with books and bow ties and we followed the color scheme of the invitation: teal and orange with gray and navy accents. You can see my baby shower inspiration board on Pinterest here.


Here's  how everything looked:

Baby pics of the mom and dad-to-be mixed with some of Heather's favorite books from when she was little. :-)


Me and the Momma-to-be
We decorated with all of our old Dr Seuss/children's books that my Mom dug out of storage. Such a cute, easy and no-cost way to decorate and got me feeling so nostalgic. Pretty sure Greg and I had to read a Berenstein Bears book or two when we were unpacking the books...
 

DIY'd tie wreath
This DIY tie wreath, which I originally saw on Pinterest, was actually quite easy to do. I got the collared shirt and the J Crew tie from a thrift store for less than $6. I had some assistance from the hubby as I have no clue how to tie a tie. Love, love this simple look for a baby boy. It can be re-purposed for the door of the baby's room and/or the hospital door (apparently decorating hospital doors is a big thing...)
 
For the "clothespin game," we hot-glued little bow ties on some of the clothespins. (You'll notice bow tie "pins" they are wearing below!) My mom is a super-crafty bitch and sewed all the bow ties herself; while I'm giving shout-outs, she also made that super-cute chevron table runner!


Now, we just have to wait for little Baby Eli to get here - and we're just a little over 8 weeks away!

Sunday, April 22, 2012

O'verlay Love


Hi, I'm still alive! I usually blog more often than this, but between work being cuh-crazy right now, wedding season parties and trying to get ready for my sister baby shower (I'm crafting like a mo-fo, right now. Like. A. Mo-fo.), I just haven't found the time or energy. But there has been a little craft I've been working on this week that I'm dying to share.

There's a good chance you've probably heard about O'verlays. But if not, they are a company that produces decorative panels (or "overlays") that you can attach to furniture to give it a more modern look or "fancy it up," if you will. When I first heard about them, oh probably about 6 months ago, I knew I had to give them a whirl. They have a line that specifically fit with Ikea furniture and, lucky me, I have an Ikea that I drive by every single day.

So, in February, when the company had a special coupon code for 15% off, I ordered their overlay kit for an Ikea Lack table (with shipping, it came in around $40ish). By itself, the table is pretty lame. And at 9.99 a pop, why wouldn't it be? But once I received the Overlays, I knew it would be adorbs. So, I lightly sanded, primed and spray painted the overlays gold.

Then, I used a liquid nails-type glue and contraption to adhere them. Easier said than done, really, as this glue gun thing and I had a rough go of it for a while.

But all in all, I adore how this table turned out. I'm going to use it in our guest bedroom as a bedside table for now.
And I can't wait to use O'verlays again. Check out some of the cute ways they've been used...
(from here)
(from here)

Sunday, April 15, 2012

Crafty Bitch: Birchbox Edition

It's no secret that I love Birchbox. For those who haven't heard of Birchbox, it's a monthly service where you receive handpicked samples (or sometimes even full-size) of high-end/premium beauty items to your door. Like a magazine subscription, but BETTER. After a few months of receiving goodies, I started to get a stack of the boxes. The, ahem, Birchboxes. And I was looking at them one night and thinking that they are the perfect size for a gift box. Besides the logo in the middle - it would need to be covered up. So I started playing around with it to see how I could re-purpose it into a gift box.

First, I took some wrapping paper and cut it in a strip (probably 1.5 x 8 inches). Then I took some clear packaging tape and attached it to the paper, with just a smidge of tape hanging over on each side. I then placed the strip right down the middle of the Birchbox and attached on the inside.

Perfect size for a cute baby onesie and a gift card.
The second go-round, I actually bought some patterned duck tape. Mine was a bright chevron pattern that I picked up for about $3-4 but I've seen leopard and tons of other prints. Simply place tape around the center of the box - I added some ribbon for extra decor and voila!
Perfect for an Etsy handmade gift for a wedding shower.

But the options are endless - you could add fabric or even this adorable metallic tape that I came across on Pinterest.

(here)
So for all of those peeps getting their monthly Birchboxes, don't throw away the box. Re-purpose it!

Happy Crafting!

Sunday, February 19, 2012

Crafty Bitch: Copy Cat

I'm a lot of things, but one thing I am NOT, is an artist. So when I decided I wanted to DIY some artwork for our master bedroom re-do, I knew I would need some reinforcements.

Enter the reinforcements:

I got these adorable Martha Stewart stencils as a Christmas gift and have been dying to use them. I knew I wanted matching artwork to go on either side of the bed above the lamps on our nightstands (I adore symmetry, what can I say?!).

It was actually this pin that gave me the idea:

(source)

Fair warning: on a scale of 1 to annoying as shiz, this is pretty darn close to the latter. I think we all learned to use a stencil in kindergarten, but for some reason, this took me a good 4+ hours to finish. At first, I was extremely frustrated by all the imperfections (look closely, you'll find quite a few smudges), but as the hubby pointed out, it makes it a little more personal and gives it kind of a cool look.

Here are my masterpieces!


Unfortunately, I can't hang them until my lamps come in (first world problems, I know...), but can't wait to see how they look.

Has anyone ever stenciled anything for their home (I mean, after the age of about 8)? I totally recommend these stencils!

Sunday, February 12, 2012

Showing Some Love

Ah, Valentine's Day. The day of lurrrrrve. I thought I would share a little craft I did. Well, I really can't call it a craft craft, more like a computer nerd craft.

So when I came across this tutorial for how to make your own printable, I knew just what I could do. I've been thinking about doing a small gallery wall (we'll call this Happy Wall, Part Deux) in our master bedroom and was looking for a quote that I could frame. I couldn't find what I was looking for on Etsy, but when I came across this one on Pinterest, I knew it was perfect.
(source)

I just thought this was the sweetest quote and really signifies what makes a great marriage. You know, never "owing" each other anything, covering each other's blind spots, and the like. (I know, I'm really cheesy.)

So, I figured I would just make it myself. I used my fave photo editing site Picnik (which sadly enough is going away in April, RIP) but you could probably use Photoshop or something similar. I sized it to ensure it would fit in a 8X10 frame and simply printed it at Walgreens Photo (although you could probably print at Kinko's, too).

Here's how it turned out:

Total cost? About $2 and an hour of time. (I was moving a little slow.)

Side note: when I showed my hubby the final product, he read it and looked at me with a most quizzical look. "Why would the sun owe the Earth anything?" he asked me. So, after a bit of explaining, he seemed to get it. :-)

And just in case anyone wants it, feel free to steal my template (happy to send you the high-res version):

Since it's busy season, the hubby and I will be celebrating Valentine's Day on Friday night (as we always do) by grilling out steaks, wine and dessert.We generally skip the crowded restaurants and pre-set menus to spend an evening in.

Happy Valentine's Week, everyone!

Sunday, January 22, 2012

Crafty Bitches: Tray Love

The only thing I love more than a good DIY project is crafting with friends. This past weekend, I spent the day with my pal Kendall (you may remember her from this fun crafting project) and we tackled a fun, easy and quick cute DIY tray. Kendall is a great friend who loves to craft and is the only other person I know who loves West Elm as much as me.

So, let's get to it.

The pinspiration came from this little diddy:
(source)

It's actually a cookie tray covered in fabric with Plexiglas on top. We both decided pretty quick we wanted something smaller. Kendall wanted a tray for her bathroom and I wanted matching trays for our bedside tables.

The supplies:
Silver mini-trays from the Dollar store ($1/each)
Fabric from Joann's Fabrics ($8/yard, but I only used maybe 1/4 of that)
Plexiglas cut to size from Lowe's ($3/each)
Pre-cut felt (.33/each)
Spray adhesive (already had)
TOTAL COST FOR THIS PROJECT: Maybe $6 per tray ($12 total)

I found this amazing orange fabric, which I thought would be a great pop of color for our nightstand in our navy and orange master bedroom.

Kendall found this bright ikat-ish fabric (on clearance, mind you!) that is going to work perfect in her bathroom and bedroom. She even bought enough to make a throw pillow down the road.

The steps were really quite easy:
1. Cut the fabric ensuring there's several inches of slack on each side
2. Spray adhesive on the tray and the back of the fabric
3. Carefully press the fabric and glue the fabric to the back (pull the corners tight so there's no bumps) - it doesn't matter how bad it looks on the back because it's going to be covered up!

4. Use spray adhesive on the back of the tray and felt and carefully press the felt (this isn't mandatory, but provides a no-scratch bottom)
Just like Martha would do!

5. Place the plexiglas down (which we had pre-cut for us at Lowe's) - they refuse to round the corners, so we simply took a sanding block I found in the hubby's toolbox and rounded them ourselves.

But why listen to me, when Martha provides this great video tutorial?!

Here's the final product:

My tray on my nightstand (and a sneak peak at our new bedding!):

Kendall's tray:

Love this craft. I think we spent spent more time in the fabric store than we did actually making the tray. And I now have a deep love for spray adhesive.

Cheers!

Wednesday, January 11, 2012

Crafty Bitch: Meal Planning

When I think "meal plan," my mind automatically goes to freshman year of college when every meal I ate was purchased from my meal plan. It was like this magic little credit card that bought me any food on campus I could ever hope for. Chick-fil-a in the student union, mixers for that date party in the student convenient store (sorry, Mom!), pizza bagels from the cafe, you name it.

Well, fast-forward to the real life and sadly enough, there is no magic credit card (at least not one that we don't have to pay off every month) that my parents under-write and meal planning means sitting down each week to decide what we're going to eat for dinner and making a grocery list. It's a sexy life, but someone has to put on her sexy sweatpants and go grocery shopping. (Oh don't worry, I plan on upgrading to the Frisco Mom uniform of a Juicy Couture track suit as soon as I have children. I mean, as if you even had to ask.)

So, when I came across these little erasable menu boards on Pinterest, I just had to put the craftiness into action and I actually really use it.

It took all of about 10 minutes to complete (my kind of craft). I picked up this frame from Ikea for like $7, a cute piece of scrapbook paper, some scrapbook letters and um, voila?

(Of course I had to pay homage to my alma mater with the orange and white paper! Think it looks just great next to my OK State Scentsy.)

And while I'm at it, I thought I'd share a few recipes that we've tried recently that we give two enthusiastic thumbs up.

First up, we tried out these (skinny) chicken rollatinis and thought they were fantastic. You also have to use a meat hammer and I found that to be therapeutic. I also forgot to take a picture until we'd already eaten several. Woops.

We LOVE seafood so when I stumbled across this spicy cajun chicken pasta recipe, we subbed the chicken with shrimp and it was ah-mazing.

We've gone on an appetizer kick lately and tried a few items:
(OK, I lost the recipe. But they were delish.)

Jalapeno poppers (though I'd recommend cutting back on the cumin; we're also going to wrap them in bacon next time!)


OK, so let's get real: my avocado fries didn't look this pretty, they took forever and made my house smell like a KFC for several days, but I have to admit: They. Were. Freaking. Awesome.

Does anyone else obsessively meal plan?

Sunday, December 4, 2011

Holiday Traditions

So, every family has their own traditions and when the hubby and I got married, I'm not sure that we necessarily MEANT to start traditions, but we have developed a few over the past few years. First, we don't buy each other Christmas gifts. At least not since we got married. Some people think it's rather odd, but the truth is, we don't really need anything. And we're always saving up for the next big purchase for our house (right now: it's bedroom furniture and decorating our bedroom!) Instead, we use the money we would spend on each other and adopt an Angel from the Salvation Army Angel Tree. Then, we go shopping together to buy gifts for our little angel.

We've actually started adopting our angel online and bringing the gifts in to the nearest mall with an Angel Tree. They make it super-easy! This year, we picked out a 10-year-old boy, who - bless his heart - appears to be a little overweight (according to his clothes size). So, we picked him out some clothes from OldNavy.com (yet to arrive) and did some toy shopping at Target.

Here, the hubby closely examines the features between two Nerf guns.

(Side note: I just read an article that there are still 12,000 angels that need adopting in DFW, so if you're interested, you can learn more here. Or visit your local Salvation Army's website. Because it is TRULY more fulfilling to give than to receive during the holidays.)

Another tradition we have is that we always decorate our tree together. First, we listen to this Christmas CD that my old roommate gave me YEARS ago (thanks, Cara!) and then we turn on Elf while we finish the tree.

And speaking of decorating the tree, here she is!

I'm just glad to see she's still standing after this weekend. While we were watching Bedlam, Greg nearly toppled the thing over when OSU made its second turnover. Was it the 7+ beers and whiskey or pure Pokes pride? I'm afraid we'll never know.

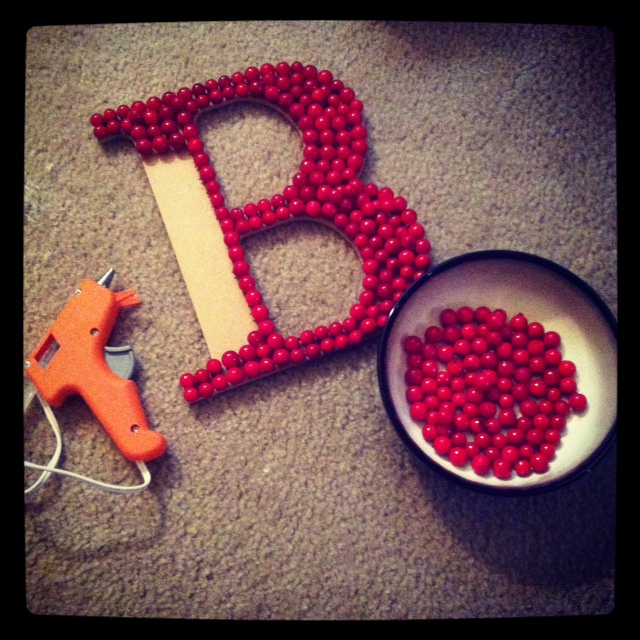
I also finally knocked out another holiday craft (that makes two down, two to go). As much as I love a cute wreath, I actually don't even have a Christmas one! So when I came across this berry wreath, I had to try it. But let me tell you - if I had to do it again, um, I wouldn't. This craft was quite a little MFer. So. Much. Work.

I bought four little berry garland sprigs from HobLob. First, I cut all the berries off. (This was a two-night ordeal.) Then, I hot-glued them on this wooden letter "B" (also scored from HobLob). Two sentences, but it took me HOURS to get finish.

I actually finished it during the aforementioned Bedlam game this weekend (Way to Go Pokes!). Simply took some leftover burlap material and tied a bow and voila! (Total cost: about 12 bucks. But about 6-7 hours that I will never get back...)

Happy December!