Showing posts with label how-to. Show all posts

Thursday, May 24, 2012

Baby Shower: How To-ing

So, I got a few questions about some of the DIY stuff I did for my sister's baby shower, so thought I'd show you how I did everything/where I found the directions/etc.

Mason Jars
So, while the mason jars did take some time, they were really easy and made such an awesome addition to the shower. Plus, I still have the jars so can re-use/re-purpose for any other showers/parties/get-togethers.

What you need:
Mason Jars (we bought two dozen - approx $22, but you can surely find them cheaper)
Ribbon (we really wanted stripes and they need to be 7/8 inches, so we ordered ours)
Hot Glue Gun
Super-cute paper-straws (totally optional, but totally worth it)

First - cut ribbon in three different sizes. You'll need the first length to wrap all the way around the jar, the second link to make a loop the size of your bow and the third length to wrap your bow. 


Now simply wrap the ribbon around the mason jar and affix it with a dab of hot glue (trust me on the "dab," it's much easier to scrape off). 


Now make your bow "loop" and glue to close the loop.


  Now take your shortest ribbon, loop it around to make a bow and add a bit of hot glue.

Now, glue the bow to the jar, add a cute straw and VOILA:

Now, repeat 23 more times. See what I mean? Not hard at all, doesn't take that long to do one. Just really repetitive.

Tissue Poufs
Let's face it - tutorials are not my strong suit. I followed these directions and, let's face it, I actually bought a kit to do the teal ones because 1. I couldn't find tissue paper that color and 2. I'm lazy.

Tie Wreath
 
My original inspiration came from this Father's Day tie wreath I found on Pinny. It was very easy, too. (See a trend, here?)

What you Need:
Men's White Collared Shirt (Go to a thrift store - approx $4)
Men's Tie (Thrift store - approx $2)
Wreath (styrofoam or otherwise - approx $4)
Yarn (approx $3)
Wooden letter ( approx $2)
Spray paint (already owned)

First, wrap the yarn around the wreath like you would for any yarn wreath.Then, take your collared shirt (ensure it's buttoned) and cut down the button line and around the collar and back down. Then, take your tie and have your husband or whatever man in your life tie the tie for you. (Or bonus points if you actually know how to tie a tie yourself!) Wrap the tie around the collar and then I just used straight pens to attach the top of the collar and the bottom to the wreath.


I got a little lazy with the yarn in the back, as you can see...

But overall, it turned out well and the whole thing only cost me about $15. Can I get a "holler"?

So, that's how I knocked out some of the fun decor for the baby shower. Hope everyone has a great Memorial Day Weekend!

Sunday, December 4, 2011

Holiday Traditions

So, every family has their own traditions and when the hubby and I got married, I'm not sure that we necessarily MEANT to start traditions, but we have developed a few over the past few years. First, we don't buy each other Christmas gifts. At least not since we got married. Some people think it's rather odd, but the truth is, we don't really need anything. And we're always saving up for the next big purchase for our house (right now: it's bedroom furniture and decorating our bedroom!) Instead, we use the money we would spend on each other and adopt an Angel from the Salvation Army Angel Tree. Then, we go shopping together to buy gifts for our little angel.

We've actually started adopting our angel online and bringing the gifts in to the nearest mall with an Angel Tree. They make it super-easy! This year, we picked out a 10-year-old boy, who - bless his heart - appears to be a little overweight (according to his clothes size). So, we picked him out some clothes from OldNavy.com (yet to arrive) and did some toy shopping at Target.

Here, the hubby closely examines the features between two Nerf guns.

(Side note: I just read an article that there are still 12,000 angels that need adopting in DFW, so if you're interested, you can learn more here. Or visit your local Salvation Army's website. Because it is TRULY more fulfilling to give than to receive during the holidays.)

Another tradition we have is that we always decorate our tree together. First, we listen to this Christmas CD that my old roommate gave me YEARS ago (thanks, Cara!) and then we turn on Elf while we finish the tree.

And speaking of decorating the tree, here she is!

I'm just glad to see she's still standing after this weekend. While we were watching Bedlam, Greg nearly toppled the thing over when OSU made its second turnover. Was it the 7+ beers and whiskey or pure Pokes pride? I'm afraid we'll never know.

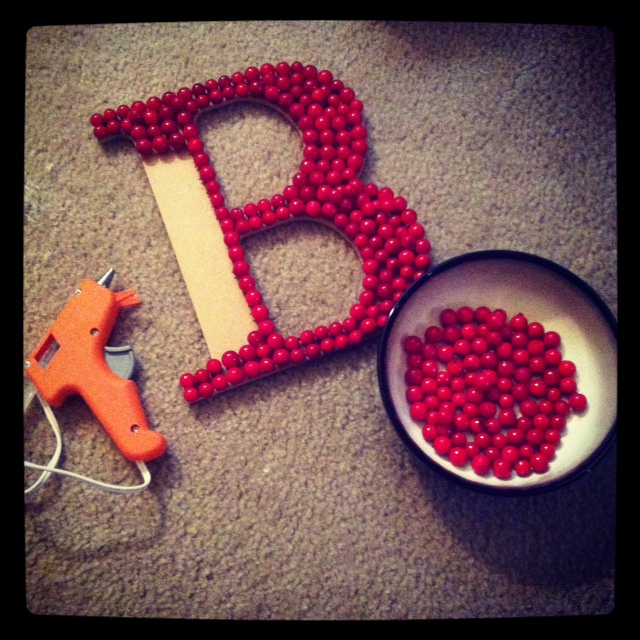
I also finally knocked out another holiday craft (that makes two down, two to go). As much as I love a cute wreath, I actually don't even have a Christmas one! So when I came across this berry wreath, I had to try it. But let me tell you - if I had to do it again, um, I wouldn't. This craft was quite a little MFer. So. Much. Work.

I bought four little berry garland sprigs from HobLob. First, I cut all the berries off. (This was a two-night ordeal.) Then, I hot-glued them on this wooden letter "B" (also scored from HobLob). Two sentences, but it took me HOURS to get finish.

I actually finished it during the aforementioned Bedlam game this weekend (Way to Go Pokes!). Simply took some leftover burlap material and tied a bow and voila! (Total cost: about 12 bucks. But about 6-7 hours that I will never get back...)

Happy December!

Sunday, February 27, 2011

Crafty Bitch(es) - Round Three

So not too many of my friends are really all that interested in home décor and DIY… one exception to that rule is my pal, Kendall. Last week, she sent me an e-mail with two super-cute DIY throw pillows, so of course we planned a date to craft. (Aren’t we cool?) Before I start, let’s get one thing straight, I LOVE to craft but my skill set is somewhat… limited. So when we planned to do the throw pillows, we quickly realized that we needed to “fake it til we make it.”

So instead of actually making the pillows, we hopped on over to Ikea (which is conveniently about 10 minutes from my house) to buy the throw pillows and the throw pillow case. Before you start thinking that most of our work was done, I’d tell you to get off your high horse. It was quite a bit of work. :-)

I’d like to take this opportunity to thank a few people for which this pillow would not have been possible. (I’m watching the Oscars right now and I think I’m getting a little inspired. Or tipsy.) First, I’d like to thank my Mom. I called her about 4 times throughout the day. Thanks for answering your phone and/or calling me back each time even though you were at work trying to deliver babies. She is my crafting idol. Next, my pal Kendall. Her eternal optimism was greatly appreciated during the mini-meltdown I had during flower making. She’s also pretty resourceful; you’ll see what I mean below. Finally, my husband who acts super enthusiastic about my little DIY projects.

Now when I first spotted this Dwell throw pillow from Target, I really wanted it, but I just wasn’t feeling the $25 price tag, especially considering I have a bed full of pillows to buy. So, we decided to DIY it. I’ll warn you (in case you feel like taking this on) that this was a many-hour project.

First, you’ll want to take the throw pillow cover and divide it into 9 sections by folding and IRONING the edges down, sort of like this.

Then, you’ll take your fabric (choose whatever color you’d like your flowers to be) and cut into two inch strips. Cut as many strips as flowers you’d like to have. Fold in half lengthwise and iron, like so…

Next you’ll need some kind of backing for which to create and glue your flowers to. The tutorial said interfacing. It was at this point in time that we called my Mom to learn exactly what that was. After learning what interfacing is and realizing we didn’t have anything, we decided to get a little creative. (Kendall’s idea.) Insert dryer sheets because we’re klassy like that.

I will tell you that if you choose to go cheap-o like us, be sure to wash the dryer sheets to remove the scent/oil, then throw them in the dryer. Check out Kendall. Get it girl.

So, then you make your flowers. Sounds easy, right? Not quite. I had a bit of a meltdown doing this. I’m pretty sure Kendall thought I was going to lose it for a minute there. So, here’s a short tutorial (although there are tons of YouTube videos and blog posts in more detail).

Take a strip of fabric, tie a knot on one end then start some kind of variation between wrapping and twisting. Still not totally sure how I did it. Hot glue as you go on the backing you use. (For us, our trusty dryer sheets.) It’ll look something like this:

Then, once you create the first flower, you’ll look super-proud, like this:

Now do that eight more times. Sweet Jesus, it took a long time. Then, simply hot glue each flower onto your throw pillow. If you’re a laid-back, confident lady like Miss Kendall, you just eye it and it looks perfect. If you’re like me, you get our your trusty tape measure, measure it five times, then carefully glue each flower, then scrutinize, get up, walk around, come back and look at it for another five minutes. Then, decide it looks pretty darn good. Then, I repeated that eight more times.

Here’s the final product and I’m pretty darn proud of Kendall and myself!

Total cost? about 13 bucks. Ikea pillow: $3; Ikea throw pillow cover: $6.99; fabric from Hobby Lobby: $2.79. Not bad. It’s the first piece I’ve made for my “gray and yellow” themed guest room I’ll be working on this spring.

Hope everyone has a great week!

Sunday, February 13, 2011

Crafty Bitch: Round Two

I’m back and between you and I, I think I’ve really outdone myself. Last weekend, after an entire week of being snowed/iced in, I was finally able to get out of the house. Since Super Bowl XLV was taking over Dallas, I decided to stay in the ‘burbs for the entire weekend. Since the hubby is in the middle of busy season, he often has to work weekends, so with no friends in the ‘burbs, I was on my own. So I decided to get crafty! I was hoping to tackle no-sew curtains for the master bathroom (as I’m very anxious to finish the re-do of that room), but had a bit of a fabric store fail. Joann’s Fabric was a freaking nightmare. Who is willing to literally “take a number” to get fabric cut? Not this girl. So that’s a craft for another day.

Instead, I decided to make a yarn wreath. Sounds kind of country bumpkin, right? Now before you cue the “Beverly Hillbillies” theme song and your mind automatically goes to the deliciously ‘90s “make your own potholder” loom kit when you think “yarn crafts,” hold tight. (Side note: Am I the only one to use this kit to make my own shitty potholder and give it to my grandma like it was the best gift ever?)

OK, let’s get back on topic. The yarn wreaths are actually really cute. My sister did one with antique buttons that inspired the idea! And let’s face it, my orange, autumn berry wreath is still up. Embarrassing. I’m shocked I haven’t received a “warning post card” from the Homeowners Association.

If you want a more in-depth, how-to on how to do this, check out Danielle Burkleo’s super-cute blog. She gives a way better tutorial than me. What can I say? I’m a crafting newbie. Now I’ll give you my quick run-down.
The supplies (a bare wooden wreath, a roll of yarn and a few pieces of felt):
First, wrap the yarn around the wreath until it’s entirely covered. It took me an entire roll of yarn – and let’s face it – about two hours to do this. I did it while watching the Super Bowl.
Next, it was time to make the flowers. Take a piece of felt and cut it into a wavy circle.
Then, start cutting in a circular strip until you get to the center (see below).
Then, start wrapping the felt tightly. The larger the circle and the more you cut, the larger the rose. So I made a few sizes. Once you get to the circular end, paste the base to the rose. I used craft glue, but hot glue would work, too!
Proud crafter with my first handmade flower:
Then, pin (or glue the flowers) onto the wreath. I pinned them so I can easily remove them if I’d like to re-do the look of the wreath without all the yarn-wrapping again.

So, here’s the end result. Not bad for a novice crafter!

All in all, it took me about the length of the Super Bowl game (so however long that is? 3.5 hours?), but it only cost about $11. A quick search on Etsy showed comparable wreaths at $25-80, so I feel it was time well-spent!